Flatkey API Quickstart: Make Your First Call Through router.flatkey.ai
If you already use the OpenAI SDK, the shortest path to a first Flatkey API call is simple: create a Flatkey key, point your client at https://router.flatkey.ai/v1, send one chat-completions request, and confirm the call in the console.
This quickstart walks through that full loop. It also shows how to add a basic fallback sequence after the first model works, without hiding errors or creating an unbounded retry chain.
What you will complete
By the end of this guide, you will have:
- A Flatkey account and API key.
- An OpenAI-compatible client using the Flatkey router.
- One successful request and a readable response.
- A console checkpoint for usage, cost, and request troubleshooting.
- A small fallback pattern you can test before production.
You do not need to rewrite your application around a new SDK for this smoke test. Flatkey's public docs expose an OpenAI-compatible endpoint at https://router.flatkey.ai/v1, so common chat, tool, streaming, and structured-output workflows can keep the familiar client shape.
Before you start
You need:
- A Flatkey account.
- A Flatkey API key beginning with
sk-fk-. - Python 3.9+ or Node.js 18+ if you want to use an SDK example.
- A model name currently available to your account.
Model catalogs and availability can change. Use the current model catalog or console rather than copying an old model name into production.
Step 1: Create your Flatkey account
Open the Flatkey sign-up flow and create an account. After signing in, use the console to create the credential your application will send with each request.
Console reference
Go to Console → API Keys.
Create a key for this quickstart and copy it immediately. Treat the key like a password: do not paste it into client-side code, commit it to Git, include it in screenshots, or send it in support messages.
For a team environment, create separate keys for separate developers or services. Flatkey's docs also describe per-key controls such as a monthly cap and an optional model allowlist. Those controls make it easier to isolate a test, rotate one credential, or stop one workload without affecting every application.
Set the key in your shell:
export FLATKEY_API_KEY="sk-fk-your-key-here"
If you use a .env file, keep it outside version control:
FLATKEY_API_KEY=sk-fk-your-key-here
Step 2: Change the base URL
The OpenAI-compatible Flatkey base URL is:
https://router.flatkey.ai/v1
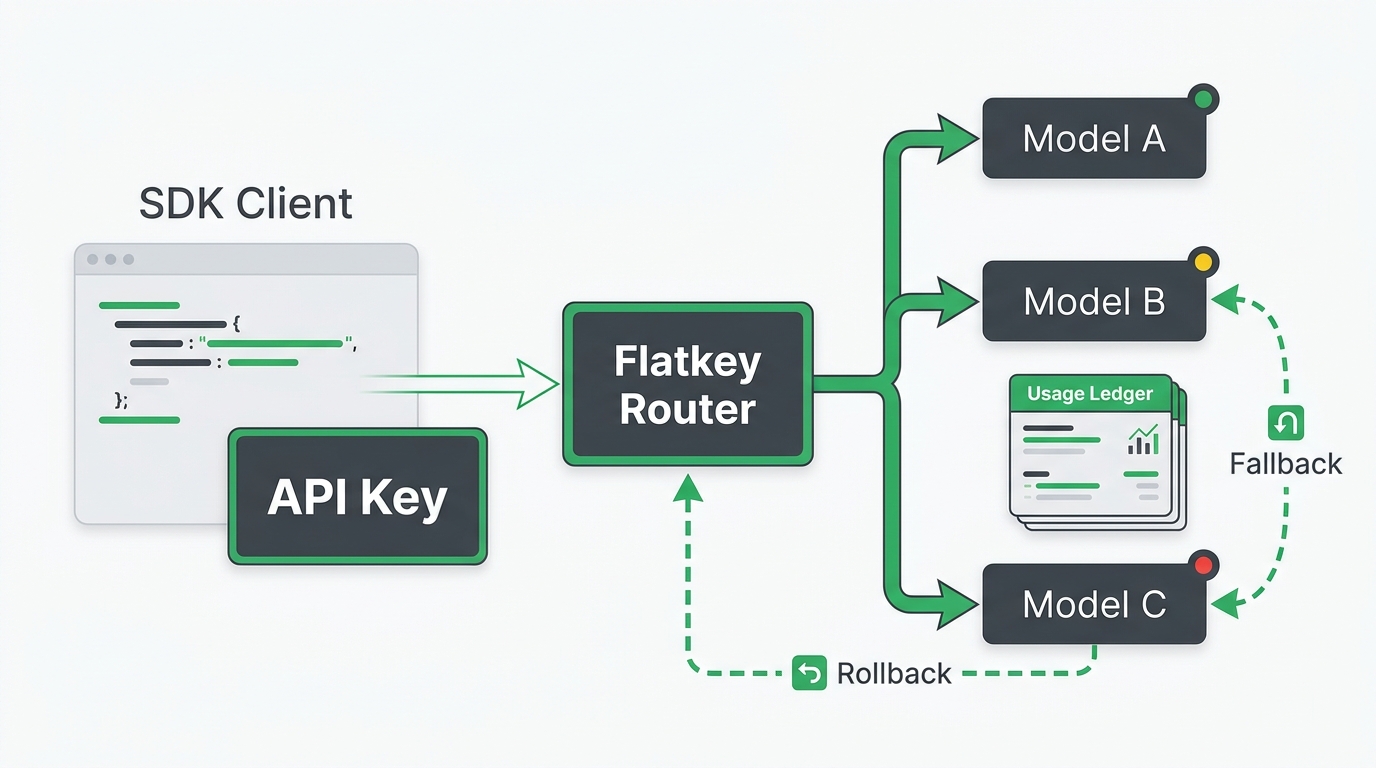
This is the most important configuration change in the quickstart. Your API key authenticates the request, while the base URL sends it through the Flatkey router instead of directly to another provider endpoint.
Keep both values in environment configuration so you can change them without editing application logic:
export OPENAI_API_KEY="$FLATKEY_API_KEY"
export OPENAI_BASE_URL="https://router.flatkey.ai/v1"
Use the variable names expected by your framework. Some libraries read OPENAI_BASE_URL; others require a base_url or baseURL option when the client is created.
Step 3: Send your first request
Start with one short, deterministic prompt. The goal is to prove authentication, connectivity, model access, and response parsing before adding streaming, tools, structured output, or fallback behavior.
Option A: cURL
Replace YOUR_CURRENT_MODEL with a model that is available in the current Flatkey catalog:
curl https://router.flatkey.ai/v1/chat/completions \
  -H "Authorization: Bearer $FLATKEY_API_KEY" \
  -H "Content-Type: application/json" \
  -d '{
    "model": "YOUR_CURRENT_MODEL",
    "messages": [
      {
        "role": "user",
        "content": "Reply with exactly: flatkey quickstart connected"
      }
    ],
    "temperature": 0
  }'
Option B: Python
Install the OpenAI client:
pip install openai
Create quickstart.py:
import os
from openai import OpenAI

client = OpenAI(
    api_key=os.environ["FLATKEY_API_KEY"],
    base_url="https://router.flatkey.ai/v1",
)

response = client.chat.completions.create(
    model="YOUR_CURRENT_MODEL",
    messages=[
        {
            "role": "user",
            "content": "Reply with exactly: flatkey quickstart connected",
        }
    ],
    temperature=0,
)

print(response.choices[0].message.content)
print(response.usage)
Run it:
python quickstart.py
Option C: JavaScript
Install the client:
npm install openai
Create quickstart.mjs:
import OpenAI from "openai";

const client = new OpenAI({
  apiKey: process.env.FLATKEY_API_KEY,
  baseURL: "https://router.flatkey.ai/v1",
});

const response = await client.chat.completions.create({
  model: "YOUR_CURRENT_MODEL",
  messages: [
    {
      role: "user",
      content: "Reply with exactly: flatkey quickstart connected",
    },
  ],
  temperature: 0,
});

console.log(response.choices[0].message.content);
console.log(response.usage);
Run it:
node quickstart.mjs
Step 4: Read the response
For a standard chat-completions request, start with four fields:
| Field | What it tells you | First-call check |
|---|---|---|
id |
The response identifier | Store it temporarily for troubleshooting |
model |
The model associated with the response | Confirm it matches the route you intended to test |
choices[0].message.content |
The assistant output | Confirm your application can extract the text |
usage |
Token accounting returned with the call | Log it for cost and regression checks |
A simplified response looks like this:
{
  "id": "chatcmpl-example",
  "model": "YOUR_CURRENT_MODEL",
  "choices": [
    {
      "message": {
        "role": "assistant",
        "content": "flatkey quickstart connected"
      },
      "finish_reason": "stop"
    }
  ],
  "usage": {
    "prompt_tokens": 12,
    "completion_tokens": 5,
    "total_tokens": 17
  }
}
The exact identifiers and token counts will differ. Your first-call success condition is not a byte-for-byte match; it is a valid HTTP response, a parseable assistant message, and usage information that your application can record.
Step 5: Check usage after the call
Do not stop at 200 OK. A useful quickstart also proves that the request is visible to the people who will operate the integration.
Console reference
Open Console → Usage & Logs after the request.
Look for the new call and confirm the details available to your account, such as:
- Request time.
- Model or route.
- Status.
- Token usage.
- Cost or balance impact.
- Error details when a request fails.
If the application received a response but the expected log entry is missing, first check that you are viewing the same account, workspace, and API key used by the request. Also record the response ID and request time before retrying; those two details make troubleshooting much easier.
Review the current Flatkey pricing page before moving from a smoke test to a sustained workload. Compare the model, request volume, token mix, and fallback behavior you expect to use—not only the cost of one successful call.
Step 6: Add a safe fallback sequence
Fallback routing should come after the first model works. Otherwise, a backup route can hide the actual problem: an invalid key, wrong base URL, unavailable model, malformed request, or account limit.
Start with a short ordered list of models that you have tested for the same job:
import os
from openai import OpenAI

client = OpenAI(
    api_key=os.environ["FLATKEY_API_KEY"],
    base_url="https://router.flatkey.ai/v1",
)

models = [
    "PRIMARY_CURRENT_MODEL",
    "FALLBACK_CURRENT_MODEL",
]

last_error = None

for model in models:
    try:
        response = client.chat.completions.create(
            model=model,
            messages=[
                {
                    "role": "user",
                    "content": "Return JSON with one key named status and value ok",
                }
            ],
            temperature=0,
        )
        print(model, response.choices[0].message.content)
        break
    except Exception as error:
        last_error = error
        print(f"Route failed: {model}")
else:
    raise RuntimeError("All approved model routes failed") from last_error
This example is intentionally small. Before using it in production, add:
- A narrow list of retryable errors.
- A per-attempt timeout and a total request deadline.
- Backoff for transient failures.
- Structured logs containing the attempted model and response ID.
- Output validation for JSON, tool calls, or other required schemas.
- A cost ceiling so fallback does not silently select an unsuitable route.
Do not retry authentication errors with several models. Do not retry malformed requests until the request is fixed. Do not treat every model as interchangeable simply because it accepts a chat-completions payload.
A practical fallback policy
Use this decision table as a starting point:
| Failure | Retry same model? | Try approved fallback? | Action |
|---|---|---|---|
| Network timeout | Once, within deadline | Yes | Preserve the original request ID and log both attempts |
| Rate limit | After backoff | Yes | Respect retry guidance and cap total delay |
| Temporary server error | Once | Yes | Stop after the approved route list is exhausted |
| Invalid API key | No | No | Rotate or correct the credential |
| Unknown/unavailable model | No | Yes | Refresh the model choice; do not loop on the same name |
| Invalid request schema | No | No | Fix and validate the payload |
| Output fails validation | Maybe | Yes | Retry only when the workflow defines a validation rule |
The core rule is simple: retry transient transport failures; fix configuration and schema failures; use a fallback only when the fallback is approved for the same product job.
Common first-call errors
401 or authentication failure
Confirm the request uses Authorization: Bearer <key>, the key is active, and no extra whitespace was copied. Verify that the application is reading the expected environment variable.
404 or wrong endpoint
Use the OpenAI-compatible base URL https://router.flatkey.ai/v1 and the chat path /chat/completions. Avoid accidentally adding /v1 twice.
Model not found or unavailable
Choose a currently available model from the live catalog or console. Do not assume a model name from an old tutorial is still enabled for your account.
Successful HTTP response but application error
Log the raw response once in a safe development environment. Confirm your code reads choices[0].message.content for chat completions and does not expect a different endpoint's response schema.
Unexpected spend during fallback
Record the attempted model on every call, cap the route list, and review Usage & Logs. A fallback policy without a deadline and cost boundary can turn one user action into several billable requests.
Production checklist
Before sending real traffic through the integration, confirm:
- [ ] The API key is stored in a secret manager or server-side environment.
- [ ] Development, staging, and production use separate keys.
- [ ] The base URL is configuration, not hard-coded across the codebase.
- [ ] The selected model is available and tested for the actual workload.
- [ ] Timeouts, retryable errors, and total deadlines are explicit.
- [ ] Fallback models use the same required output contract.
- [ ] Usage and error logs are visible to the operating team.
- [ ] Cost expectations were checked against current pricing.
- [ ] Key caps or allowlists are configured where appropriate.
- [ ] A rollback path can restore the previous route quickly.
Make the first call, then optimize
The fastest way to evaluate Flatkey is to keep the first test narrow. Create one key, change one base URL, send one request, read one response, and find the same call in Usage & Logs.
After that path is proven, add fallback routing as an observable policy rather than a hidden retry loop. Keep the approved model list short, preserve error evidence, validate the output, and review current pricing before increasing traffic.
When you are ready, create a Flatkey account, make the first call through router.flatkey.ai, and use the console record as the acceptance test for your integration.